[好歌推荐]Matthew Barber – And You Give

歌名: And You Give

歌手: Matthew Barber

专辑: Ghost notes

歌词:

It started out two winters past
Time stood still we were moving too fast
You ran away April, May and June
When you came back I was over the moon

I was high, I was high over the moon
You were there, you were there midnight and noon oh
Bring it back, bring it back
We started too soon
I was high, I was high over the moon oh oh

Then came fall babe and we fell hard
Bruised our bodies, skinned our knees and our hearts
Then I got sick yeah but no one could tell
Now I drink your love drink right from the well

And it’s good and its good right from the well
Wanna taste, wanna touch, wanna see and smell oh
And it feels like it feels, heals me so well
Wanna drink, wanna drink right from the well oh oh

Now here I sit in my burning cell
Summer sun beating hotter than hell
I need your love like the air I breath
I need it more than you could ever believe

And you give and you give, give it to me
And you give and you give all that I need oh
And I take and I take, blood that you bleed
And you give and you give, give it to me oh

And you give and you give, give it to me
And you give and you give all that I need oh
And I take and I take, blood that you bleed
And you give and you give, give it to me oh

音乐轻松,优美…另外也推荐Where the river bends 😀

Matthew Barber – And You Give

Zen Cart 1.5 图文安装过程全说明

最近公司需要我来维护一个zen cart后台系统的电子商务网站.说目前的网站问题很多,包括很多系统模块功能都出现问题.好吧,既然如此我又要在本地装个zen cart后台系统了.第一次装这个,还是跟大多数一样,从官方下载了zen-cart-v150-utf8-20120309.zip安装包后,解压所有文件(2222个文件共12MB= =!)并放置在你的本地PHP服务器环境的网站访问目录,例如:”E:\wamp\www\mall”,在没有设置本地域名直接访问本地网站的情况下,通过输入”http://localhost/mall”可以访问,或是你希望通过设置本地域名访问,例如”http://m.net”,当然具体办法不再复述,不会的话可以看看此文Apache创建本地域名的服务器(WAMP环境).我为了方便,我也简单修改了hosts文件和httpd-vhosts.conf.那么此刻输入http://m.net,将会提示下面内容:

Zen Cart 1.5 未安装时访问效果

于是继续点击安装:

继续阅读“Zen Cart 1.5 图文安装过程全说明”

儿时的回忆之格什温<<蓝色狂想曲>>有感

前几天, 听着音乐时,随机播放到这一曲<<Rhapsode in Blue(extract)>>,来自<<Best Piano Classics 100 (CD2)>>内track03.突然间,心中一股难以表达的心情.当然其他专辑也有,比如:<<The 50 Most Essential Pieces of Classical Music>>,当然也有电影Manhattan发行于1979年的插曲也是.

就是这曲,有一次几乎花了2,3个小时翻遍了每一首歌曲,却没有找到它,这次偶然再次遇到,当然不能再次忘记它的曲名,那么这个交响乐实际上应该是叫做<<Rhapsody in Blue>>于1924年美国作曲家乔治·格什温创作的.至于他的音乐背景大家可以自己去了解下.

好了,进入正题,为何称之为儿时的回忆,记得很小的时候,至于小学几年级看过电视节目上一部动画短片.当时感触也很深,至今记忆犹新.回想,从来没有想过小时候竟然有机会接触到如此名曲,甚至是当地电视台节目,每天大概6,7点因为电视节目少而随便穿插的一些国外的动画.现在回想,原来十五年前,当地电视台的节目策划人如此有品位…现如今再次看了一遍这段动画,觉得毫不落后,仍有着现代气息…只在网上找到了土豆的视频动画地址,与大家分享一下了.

不知道大家看了有什么感受…只能感觉大现代都市,繁华,仓促,不同角色的人们为生活而努力奋斗,虽然生活充满了无奈,心酸,悲伤,我们拥有的梦想始终难以实现,我们仍在继续…动画充实饱满,虽然不清楚作者的本意是否如此,但总能给人一些共鸣.极其感染力的节奏,让人回味无穷.

在网上也找了许多版本,感觉也都差不多.这里分享给大家,可以右键另存为,或者直接下载:

Gershwin: Rhapsody in Blue—Richard Trythall, pianist  18.1MB (00:19:51)

Rhapsody In Blue—Andre Previn,伦敦交响乐团 20.5MB (00:15:00)

格什温 蓝色狂想曲—Unknown 😯 6.54MB (00:03:33)

好了就写这么多吧.电脑上还有下载几个版本自己收藏着咯

如何为第一个或最后一个元素甚至是某类规律元素添加样式?

有时候,我们在写DIV+CSS的时候,在某一类相同的元素内想给其中的第一个元素或者最后一个元素,甚至是其中某些特定的有规则的排列的元素添加特别的CSS样式,我们该如何下手?下面我将给大家将就一些在CSS中十分实用的方法.

首先,你可以手动使用下面这段代码来应用修改某个元素的效果(当然这个办法很笨,是个人都知道):

http://jsfiddle.net/kingterrors/szCM9/embedded/result,html,css/

PS:由于近日(2014年6月)jsfiddle无法正常访问,可能受内网影响,现将之前所有jsfiddle预览去除,不过你仍然可将以上地址拷贝到浏览器预览,或选择尝试以下代码:

<!doctype html>
<html lang="en">
<head>
<meta charset="UTF-8">
<title>how to remove margins for first last elements</title>
<style type="text/css">
ul {
    border: 1px solid #000;
    margin: 0;
    padding: 0;
    list-style: none;
    float:left;
}
ul li {
    background:#eee;
    color: #F00;
    margin: 50px;
}
.first {
    color: #000;
    margin-top: 0 !important;
    margin-left: 0 !important;
}
.last {
    color: #0f0;
    margin-bottom: 0 !important;
    margin-right: 0 !important;
}
</style>
</head>
<body>
<ul>
  <li class="first">Hello, This is first element</li>
  <li>WOW, so many elements</li>
  <li>WOW, so many elements</li>
  <li>WOW, so many elements</li>
  <li class="last">Here it is, The last element</li>
</ul>
</body>
</html>

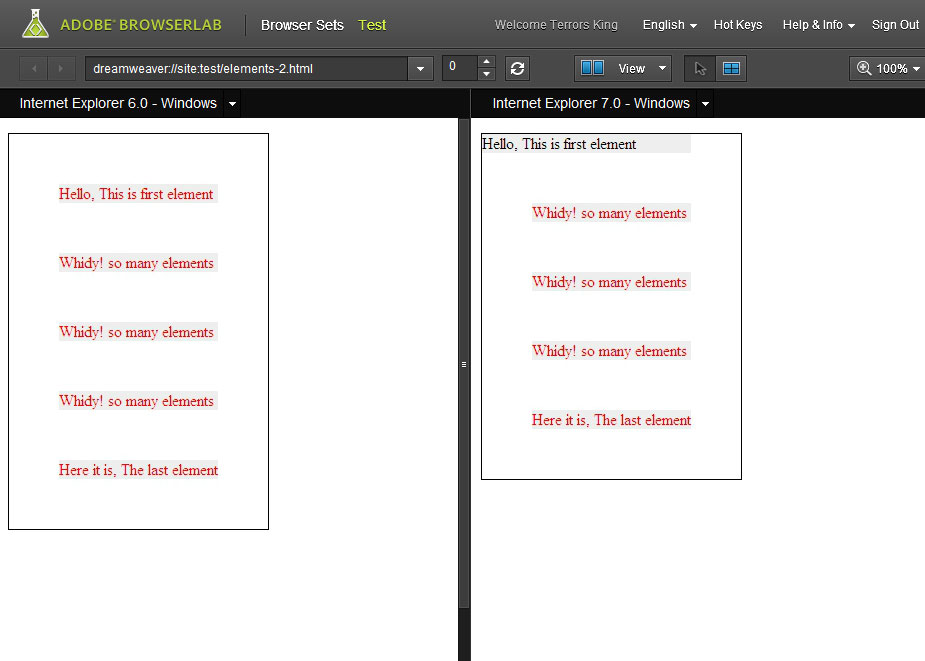
当然你也可以利用:first-child伪类和:last-child伪类(当然这种效果IE6完全不支持,IE7,IE8部分支持,其中IE7和IE8效果相同,不支持:last-child),比如:

http://jsfiddle.net/kingterrors/44GzJ/embedded/result,html,css/

PS:由于近日(2014年6月)jsfiddle无法正常访问,可能受内网影响,现将之前所有jsfiddle预览去除,不过你仍然可将以上地址拷贝到浏览器预览,或选择尝试以下代码:

<!doctype html>
<html lang="en">
<head>
<meta charset="UTF-8">
<title>how to remove margins for first last elements</title>
<style type="text/css">
ul {
    border: 1px solid #000;
    margin: 0;
    padding: 0;
    list-style: none;
    float:left;
}
ul li {
    background:#eee;
    color: #F00;
    margin: 50px;
}
ul li:first-child {
    color: #000;
    margin-top: 0 !important;
    margin-left: 0 !important;
}
ul li:last-child {
    color: #0f0;
    margin-bottom: 0 !important;
    margin-right: 0 !important;
}
</style>
</head>
<body>
<ul>
  <li>Hello, This is first element</li>
  <li>Whidy! so many elements</li>
  <li>Whidy! so many elements</li>
  <li>Whidy! so many elements</li>
  <li>Here it is, The last element</li>
</ul>
</body>
</html>
IE6,IE7,IE8都不能完好支持first-child和last-child伪类

其中还有种很另类的方式,给任意元素的规则性的添加伪类.比如你有5个li元素,你想让每两个li有区别,比如应用在有些特殊列表,你给每两行加上不同的背景色,我这里随便做了个效果给大家参考:

http://jsfiddle.net/kingterrors/76jxP/embedded/result,html,css/

PS:由于近日(2014年6月)jsfiddle无法正常访问,可能受内网影响,现将之前所有jsfiddle预览去除,不过你仍然可将以上地址拷贝到浏览器预览,或选择尝试以下代码:

<!doctype html>
<html lang="en">
<head>
<meta charset="UTF-8">
<title>how to remove margins for first last elements</title>
<style type="text/css">
ul {
    border: 1px solid #000;
    margin: 0;
    padding: 0;
    list-style: none;
    float:left;
}
ul li {
    background:#eee;
    color: #F00;
    margin: 50px;
}
ul li:nth-child(2n) {
    color: #000;
    margin-top: 0 !important;
    margin-left: 0 !important;
}
</style>
</head>
<body>
<ul>
  <li>Hello, This is first element</li>
  <li>Whidy! so many elements</li>
  <li>Whidy! so many elements</li>
  <li>Whidy! so many elements</li>
  <li>Here it is, The last element</li>
</ul>
</body>
</html>

当然这个在IE8以下包括IE8的版本都是不被支持的 😯 !

最后总结一下:first-child和:last-child伪类在IE6下是完全不支持的,而IE7和IE8仅支持:first-child,IE9是完全支持的.而:nth-child只有IE9支持,其他的比如Safari 3+, Firefox 3.5+ and Chrome 1+是完全支持以上效果的.


另外,你也可以用jq来控制某个任意元素的样式,之前我也提到过,有兴趣可以看看列表中最后一个元素样式清除修改方法 🙄

如果有兴趣可以参考下原文,Remove Margins for First/Last Elements

wordpress评论区域下方添加表情图标方法

最近研究淘宝网店,顺便自己开了个做测试,没想到拉了个小客户,虽然交易价很便宜只有一元钱,并且花了一会就解决了他的问题.

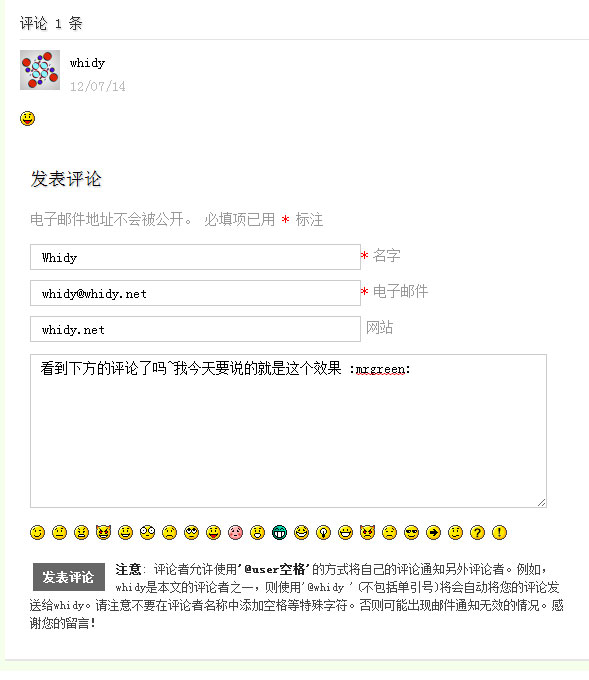
随后他又遇到了一些问题想我询问,不过我以学习研究的态度帮助了他,这也就是今天要说的内容,何如给wordpress模板的评论区域快添加一排表情.先来看看效果图…

表情图片位于评论区内的效果
表情图片位于评论区内的效果

看后大家觉得这个很简单的,其实说简单也简单说有点麻烦也的确有点麻烦.首先我要说的是,调用系统默认的表情是需要在适当的位置添加下面一行代码:

<?php if ( function_exists(cs_print_smilies) ) {cs_print_smilies();} ?>

然而究竟是在哪里添加这段代码呢,我们继续分析研究…

可能回事修改主题的comments.php模板文件,但是当你找到评论区表单部分的时候,你发现居然只有短短的一句话:

<?php comment_form(); ?>

于是这个要么就出现在了整个评论表单区域的前面要么出现在了最底部,这并不美观,更不是我们想要的.所以修改comments.php是做不到的…那么就需要研究一下comment_form();这个函数了,可能是我比较笨,我首先想到的依然是主题目录下的functions.php文件里面修改,恰巧我也找到了,不过略不相同,抱着试试的态度,搜索到了comment_form_default_fields,具体完整代码如下:

add_filter('comment_form_default_fields','MxS_fields');
/** -----------------------------------------------
	 * custom comments
*/ 
if ( ! function_exists('MxS_custom_comments')) {
function MxS_custom_comments($comment, $args, $depth) {
$GLOBALS['comment'] = $comment;
?>
<li <?php comment_class(); ?> id="li-comment-<?php comment_ID() ?>">
<div id="comment-<?php comment_ID(); ?>">
<div class="message_head">
<span class="avatarx"><?php echo get_avatar($comment,$size='40',$default='' ); ?></span>
<span class="name"><?php comment_author_link() ?></span> <?php edit_comment_link( __( '(Edit)', 'mxs_theme' ), ' ' ); ?>
<span class="reply"><?php comment_reply_link( array_merge( $args, array( 'depth' => $depth, 'max_depth' => get_option('thread_comments_depth') ) ) ); ?></span>
</div>
<span class="date"><?php comment_date('y/m/d') ?></span>
<div class="clear"></div>
<div class="cmt_text"><?php comment_text(); ?></div>
</div><!-- #comment-##  -->	
<?php }}

当然这个函数之前的语句是与这个函数没有什么关系的.看这个函数,写的是已评论的表单结构.貌似也不对,其中有一句$GLOBALS[‘comment’] = $comment;目测好像是调用系统全局评论变量,具体是啥意思,我这PHP外行也不大明白…改来改去还是没该成功,于是想到会不会是跟系统函数模块有关.于是继续查找…找到了wp-includes/comment_template.php打开一看,仍然搜索comment_form,在1510行,找到了好长一段…耐心读下去..一直看到<?php if ( comments_open() ) : ?>字面上意思是,如果评论功能开启,则执行以下语句,接着看,就发现跟表单相关了.找到

<?php echo $args['comment_notes_after']; ?>
<p class="form-submit">
  <input name="submit" type="submit" id="<?php echo esc_attr( $args['id_submit'] ); ?>" value="<?php echo esc_attr( $args['label_submit'] ); ?>" />
  <?php comment_id_fields( $post_id ); ?>
</p>

其实也就看出来了,我不正是要在submit之前添加表情么?果断在form-submit前面加一行之前提到的表情调用代码,修改如下:

<?php echo $args['comment_notes_after']; ?>
<?php if ( function_exists(cs_print_smilies) ) {cs_print_smilies();} ?>
<p class="form-submit">
  <input name="submit" type="submit" id="<?php echo esc_attr( $args['id_submit'] ); ?>" value="<?php echo esc_attr( $args['label_submit'] ); ?>" />
  <?php comment_id_fields( $post_id ); ?>
</p>

保存,接着刷新一下文章内容页看到评论区域就有了表情了.至此关于wp评论区域调用系统自带的表情图标功能就实现了.是不是很简单啊 😀

PS: 似乎这个方法在现在的3.8.2修改无效了.如果不行就直接装个Custom Smilies插件吧~(2014年4月9日)